
Introduction
If you are reading this, you are likely staring at a messy, deeply nested widget tree, frustrated by how hard it is to pass a simple AuthService or UserRepository down to a button that needs it. Or worse, you’ve already tried to implement a get_it flutter dependency injection setup, but your app is crashing on startup with a terrifying StateError: No type registered or a stack overflow error.
Take a deep breath. You are not alone. In my 5+ years of building and maintaining large-scale production Flutter apps, dependency management is consistently the number one roadblock developers face when transitioning from a simple starter app to a production-grade application.
This article is for intermediate Flutter developers who are tired of “prop drilling” (passing variables through dozens of constructors) and want a clean, scalable way to manage services. We are going to solve your dependency injection problems completely. By the end of this guide, you will know exactly how to implement dependency injection in Flutter using get_it, how to avoid the common pitfalls that cause crashes, and how to structure your app for the long haul in 2026.
What the Problem Is
In Flutter, the problem starts when your app needs to share data or services (like an API client, a local database, or an analytics tracker) across multiple screens that are far apart in the widget tree.
Developers usually start by passing these services through constructors. This works fine for two or three widgets. But in a real-world app, you might have a SettingsScreen that needs the ThemeService, but to get there, the service has to be passed through MaterialApp, HomePage, ProfileTab, and finally SettingsScreen. The intermediate widgets don’t even care about the ThemeService—they are just acting as dumb pipes. This creates tight coupling, making your code rigid and almost impossible to test.
When developers try to fix this by using a massive list of global variables or wrapping the entire app in dozens of Providers, they run into performance bottlenecks and context-lookup errors.
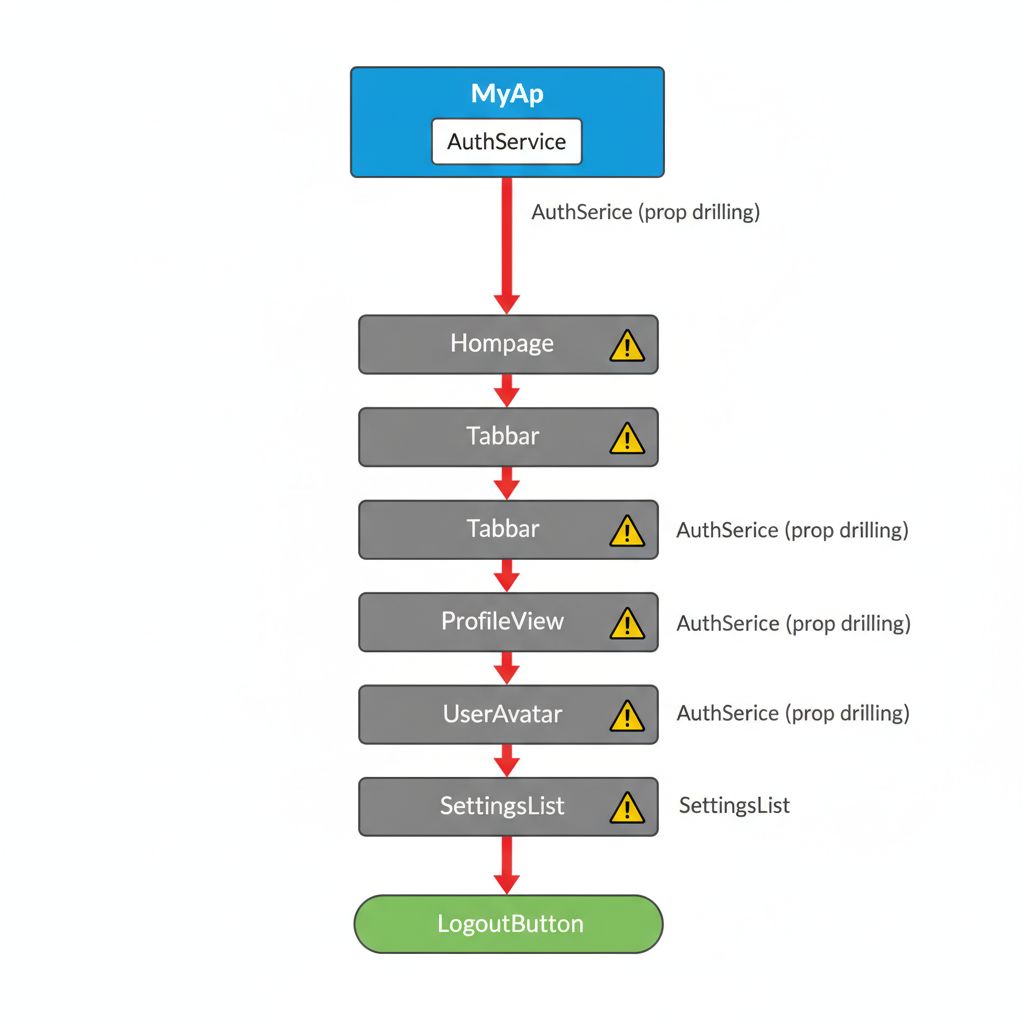
Why This Happens (Real Explanation)
The root cause of this frustration is a misunderstanding of what the Flutter widget tree is actually designed to do. The widget tree is optimized for rendering UI and managing localized state. It is not a dependency graph.
When you force the widget tree to act as your dependency injection container (for example, by heavily relying on InheritedWidget for static services), you bind the lifecycle of your business logic directly to the lifecycle of your UI. If a widget is removed from the tree, its context is gone, and any service lookups relying on that context will fail.
This is where the flutter service locator pattern comes in. While we often call it “dependency injection,” get_it is technically a Service Locator. Instead of the parent widget injecting the dependency into the child, the child widget reaches out to a central, globally available registry (the locator) and says, “Hey, I need the AuthService. Give me the current instance.” This completely decouples your business logic from the UI tree.
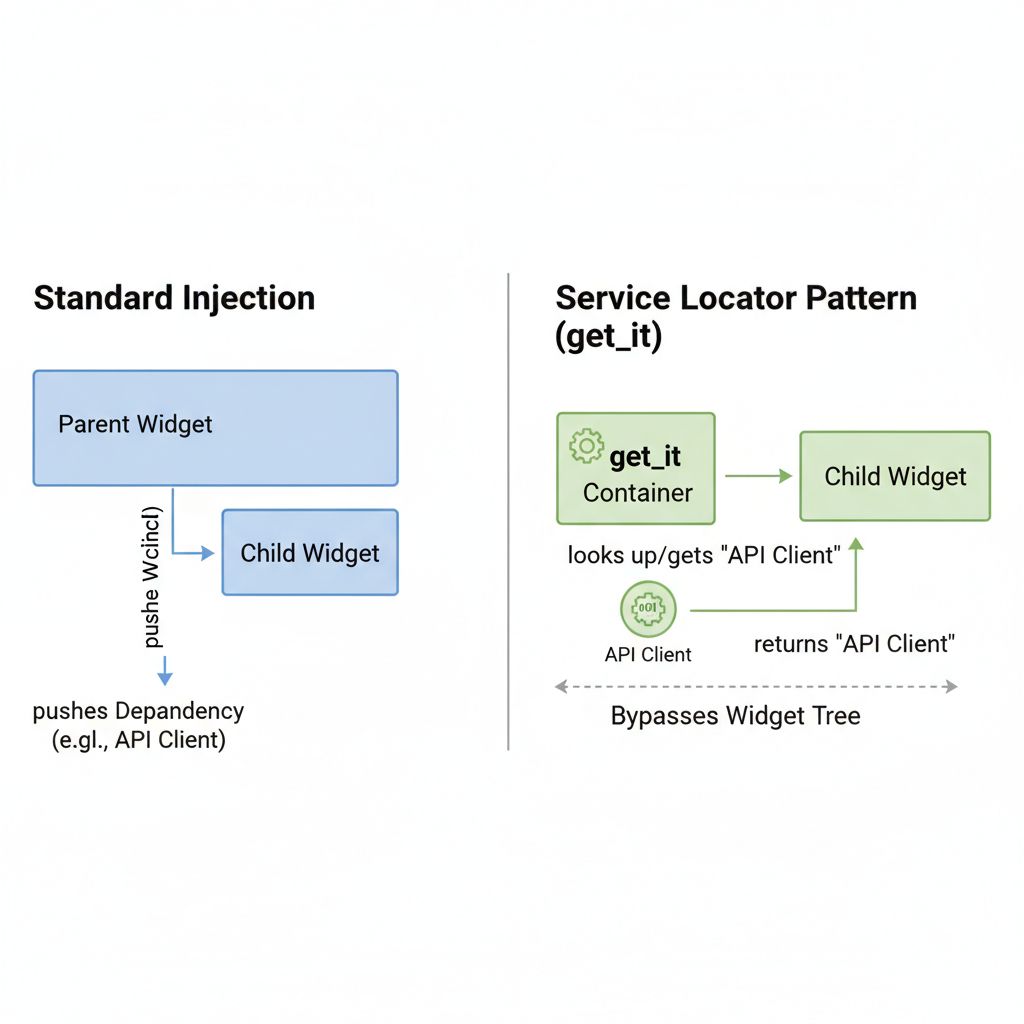
When You Usually See This Issue
You will typically slam into dependency management issues in these realistic scenarios:
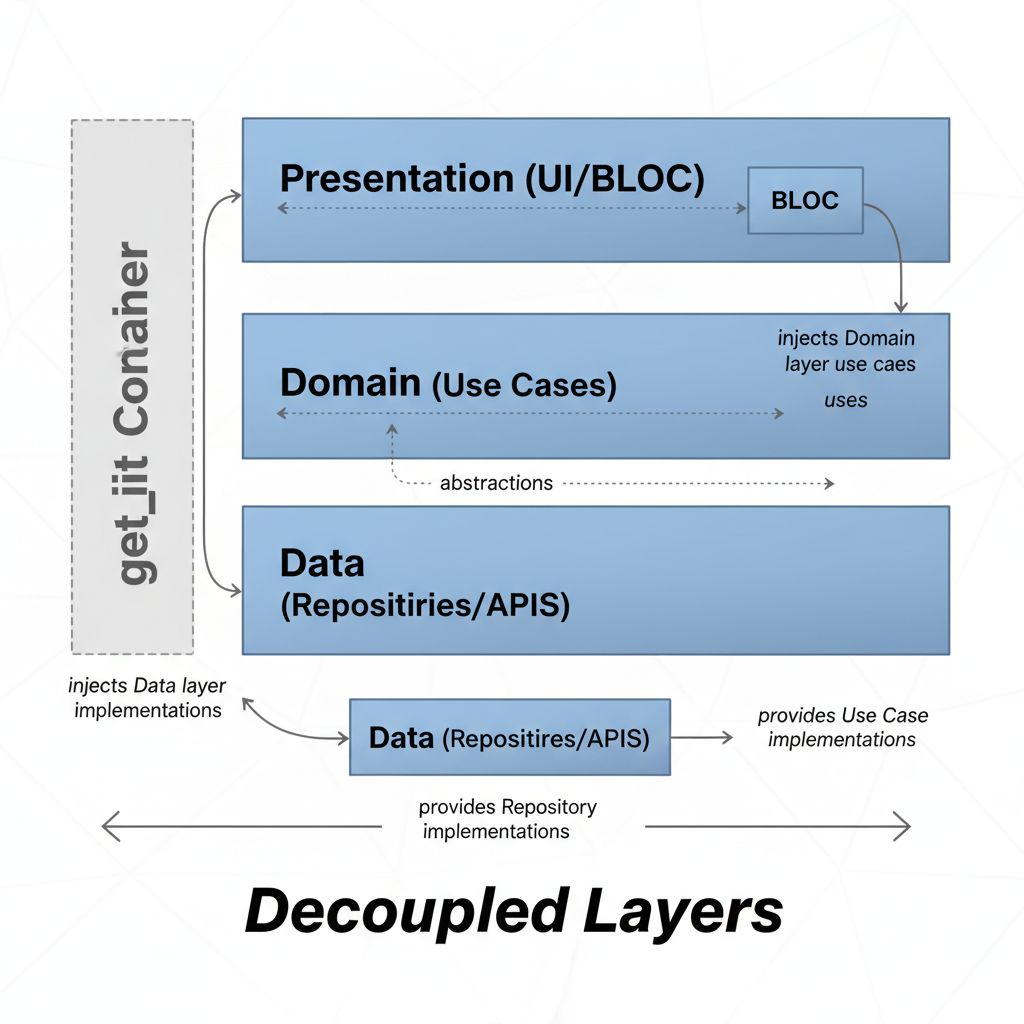
- Implementing Clean Architecture: When you are trying to separate your Data layer (Repositories, Data Sources) from your Domain layer (Use Cases) and Presentation layer (BLoC/Cubit). You need a way to wire them all together without cluttering the UI.
- Writing Widget Tests: When you try to test a screen, but the test crashes because the screen expects a live API connection deep inside its logic. You realize you have no easy way to swap the real API with a mock version.
- Scaling a Client Project: The app has grown from 5 screens to 50 screens. Initialization in
main.darttakes too long, and you need a way to load services lazily only when the user navigates to a specific feature.
Quick Fix Summary (Decision Shortcut)
If you are actively stuck and just need the core flutter get_it setup example right now, follow these three steps:
- Install: Add
get_it: ^7.6.7(or latest stable) to yourpubspec.yaml. - Setup: Create a global instance:
final locator = GetIt.instance;. Register your classes inside asetupLocator()function called beforerunApp(). - Consume: Stop passing services through constructors. Instead, use
locator<MyService>()directly inside your BLoCs, ViewModels, or Widgets.
Step-by-Step Solution (Core Section)
Let’s walk through the exact, production-ready way to implement a flutter di container get_it setup. We will build a clean, maintainable architecture.
Step 1: The Setup File
Never scatter your get_it registrations across multiple files. Create a dedicated file, usually named locator.dart or injection_container.dart.
import 'package:get_it/get_it.dart';
import 'services/auth_service.dart';
import 'repositories/user_repository.dart';

// 1. Create a global instance of GetIt
final GetIt locator = GetIt.instance;

// 2. Create a setup function
void setupLocator() {
  // We will register our dependencies here

  // Example: Registering a service
  locator.registerLazySingleton<AuthService>(() => FirebaseAuthService());

  // Example: Registering a repository that depends on the service
  locator.registerFactory<UserRepository>(() => UserRepositoryImpl(
    authService: locator<AuthService>(),
  ));
}
Notice how UserRepositoryImpl requires an AuthService. Instead of passing it manually, we just call locator<AuthService>(). get_it handles resolving the dependency graph for us.
Step 2: Initialize Before runApp
You must call your setup function before your app starts. Open your main.dart file:
void main() async {
  // Ensure Flutter bindings are initialized before accessing native code
  WidgetsFlutterBinding.ensureInitialized();

  // Initialize dependency injection
  setupLocator();

  runApp(const MyApp());
}
Step 3: Understanding Registration Types (Crucial)
The most common reason apps crash with memory leaks or outdated data is choosing the wrong registration type. You must understand the difference between flutter get_it singleton vs lazy singleton and factories.
- Factory (
registerFactory): Every time you calllocator<MyClass>(),get_itcreates a brand new instance. Use this for ViewModels, BLoCs, or anything that holds UI state that should be destroyed when the screen is closed. - Singleton (
registerSingleton): Creates the instance immediately whensetupLocator()runs. The exact same instance is returned every time. Use this sparingly, as it slows down your app’s startup time. - Lazy Singleton (
registerLazySingleton): The sweet spot. The instance is only created the very first time you calllocator<MyClass>(). Subsequent calls return that exact same instance. Get_it lazy singleton flutter is the best practice for API clients, Database helpers, and global services likeAuthService.
Step 4: Using Dependencies in the UI layer
Now, how do we use this in our UI? If you are using a state management solution like BLoC, you inject the repository directly into the BLoC. If you are struggling to decide which state manager to use, I highly recommend reading about Flutter Cubit vs BLoC: When to Use Each for Scalable Apps.
// Inside your UI widget or state initialization
final userRepository = locator<UserRepository>();

// Or injecting into a BLoC
locator.registerFactory<UserBloc>(() => UserBloc(
  userRepository: locator<UserRepository>(),
));
For a deeper dive into setting up BLoC properly with injected dependencies, check out our Flutter BLoC Tutorial for Beginners.
Step 5: Scaling with Injectable (Advanced but Recommended)
As your app grows to hundreds of files, manually registering every class in setupLocator() becomes tedious and prone to human error. This is where the flutter injectable get_it combination shines. Injectable is a code generator that writes your get_it setup for you based on annotations.
import 'package:injectable/injectable.dart';

@lazySingleton
class AuthService {
  // Implementation
}

@injectable
class UserBloc {
  final AuthService authService;

  // Injectable automatically knows to look up AuthService in get_it!
  UserBloc(this.authService);
}
Run the build runner, and it generates the entire locator.dart file automatically. This is the absolute gold standard for flutter clean architecture get_it setups in 2026.
Common Mistakes Developers Make
Even experienced developers trip up on these issues. Here is what to watch out for:
1. The Dreaded Stack Overflow Error
A flutter get_it stack overflow error happens when you create a circular dependency. For example: Class A requires Class B in its constructor, but Class B requires Class A in its constructor. When get_it tries to resolve A, it needs B, which needs A, looping infinitely until the app crashes.
The Fix: Refactor your architecture. Two classes should rarely depend on each other mutually. Extract the shared logic into a third class (Class C) that both A and B can depend on.
2. Registering UI Components
Never register Flutter Widgets in get_it. get_it is for business logic, services, and state management classes. Widgets should remain pure and be rebuilt by the Flutter framework. Mixing UI into your service locator leads to massive memory leaks and zombie widgets holding onto dead contexts.
3. Forgetting to Await Async Singletons
If you have a service that requires asynchronous initialization (like SharedPreferences or a local SQLite database), you must use registerSingletonAsync.
locator.registerSingletonAsync<SharedPreferences>(() async {
  return await SharedPreferences.getInstance();
});

// In main.dart, you MUST wait for it:
await locator.allReady();
runApp(MyApp());
If you forget await locator.allReady();, your app will try to read from the database before it’s open, resulting in a null pointer exception.
Warnings and Practical Tips
⚠️ Do not use get_it for State Management.
get_it is a dependency injection tool, not a state manager. It does not rebuild your UI when data changes. You should use get_it to provide your BLoCs, Cubits, or ViewModels, and let those tools handle the UI rebuilds. If you are debating your state management approach, read our guide on Riverpod vs Provider Flutter: Why It’s Time to Switch in 2026.
💡 Depend on Abstractions, Not Implementations.
This is the “D” in SOLID principles. When registering with get_it, register the abstract class (interface) and provide the concrete class.
// GOOD
locator.registerLazySingleton<AuthRepository>(() => FirebaseAuthRepository());

// BAD
locator.registerLazySingleton<FirebaseAuthRepository>(() => FirebaseAuthRepository());
This allows you to easily swap FirebaseAuthRepository with MockAuthRepository during testing without changing a single line of code in your UI.
Edge Cases and Limitations
How to use get_it in Flutter Widget Test
Testing is where get_it can sometimes feel like a burden if not handled correctly. Because get_it is a global singleton, state from one test can bleed into another, causing flaky tests.
The Fix: You must reset get_it before every single test using the setUp function.
setUp(() async {
  await locator.reset();
  // Register mock dependencies for this specific test
  locator.registerSingleton<AuthService>(MockAuthService());
});
By resetting the locator, you guarantee a clean slate for every test, ensuring your widget tests remain deterministic and reliable.
Scoping and Disposing
By default, everything in get_it lives forever until the app closes. If you have a memory-heavy service that is only needed for a specific user flow (like a complex image editor), you should use get_it scopes. You can push a new scope, register temporary dependencies, and then pop the scope when the user leaves that flow, automatically disposing of the objects.
What Happens If You Ignore This Problem
If you decide to skip proper dependency injection and rely on passing variables down the tree or using global variables, you are accumulating massive technical debt.
Eventually, your app will reach a point where adding a single new feature requires modifying 15 different files just to pass a dependency down. Your widget tests will become impossible to write because you cannot mock external APIs. When a bug occurs, tracing the data flow through a spaghetti network of constructors will cost you days of debugging. Setting up get_it takes 10 minutes today, but saves hundreds of hours of refactoring tomorrow.
FAQ Section
Flutter service locator vs dependency injection: What is the difference?
Technically, true Dependency Injection (DI) pushes dependencies into a class from the outside (usually via the constructor). A Service Locator (like get_it) requires the class to actively reach out and pull the dependency from a central registry. While purists argue the difference, in the Flutter ecosystem, get_it is the de facto standard used to achieve the goals of DI.
Flutter dependency injection Riverpod vs get_it?
Riverpod is primarily a reactive caching and state management framework, but it is so powerful that it can completely replace get_it for dependency injection using its Provider system. If you are already using Riverpod for state management, you do not need get_it. If you are using BLoC, Cubit, or standard Provider, get_it is highly recommended for managing your services.
Flutter get_it vs Provider: Which is better for DI?
Provider relies on the Flutter Widget Tree (InheritedWidget) to pass dependencies. This means you need a BuildContext to access a service. get_it lives outside the widget tree, meaning you can access your services anywhere—even inside background isolates or plain Dart classes that have no concept of UI. For pure business logic, get_it is vastly superior.
Final Takeaway & Conclusion
Mastering dependency injection best practices with get_it is a defining moment in a Flutter developer’s career. It marks the transition from writing code that “just works” to writing code that is scalable, testable, and professional.
Your Actionable Checklist:
- Remove deeply nested dependencies from your widget constructors.
- Install
get_itand create a dedicatedlocator.dartfile. - Register your global services as
LazySingletonand your state/viewmodels asFactory. - Use abstractions (interfaces) for your registrations to make testing a breeze.
- Consider adding
injectableonce your project exceeds 20-30 dependencies.
Don’t let dependency spaghetti slow you down. Implement the get_it service locator today, clean up your main.dart, and enjoy the peace of mind that comes with a beautifully structured, heavily decoupled Flutter application. You’ve got this!