
Introduction
If you are trying to implement a flutter upload image firebase storage feature, you already know it is rarely as simple as the basic tutorials make it look. You pick an image, pass it to Firebase, and suddenly you are staring at a frozen UI, a cryptic FirebaseException, or an upload that silently fails in the background.
As a Flutter developer who has built production apps for over five years, I can tell you that handling file uploads is one of the most common friction points. Users expect a seamless experience. If they are uploading a 5MB profile picture on a spotty 4G connection, they need to see a progress bar. If they don’t, they will assume the app is broken, tap the upload button five more times, and eventually close your app in frustration.
This article is written for developers who are stuck or want to build a robust, production-ready image upload system. We are going to move past the basic “hello world” examples. Instead, we will build a complete solution that handles the image picking, manages the upload stream, displays a real-time progress bar, and gracefully catches errors. By the end of this guide, you will have a rock-solid upload feature that you can confidently ship to real users in 2026.
What the Problem Is
In a real-world scenario, uploading an image isn’t just a single asynchronous function call. When developers first attempt this, they often use a simple await FirebaseStorage.instance.ref().putFile(file). While this works in a perfect environment with gigabit internet, it completely falls apart in the wild.
Here is what developers actually experience when they get stuck:
- The UI Freezes: Because the upload is awaited without any state updates, the user is left staring at a static screen. There is no feedback indicating whether the image is uploading or if the app has crashed.
- Platform Exceptions: You might encounter permission errors on iOS or Android because the file path returned by the image picker isn’t properly formatted or accessible.
- Web Incompatibility: You write code that works perfectly on iOS and Android, but when you compile for Flutter Web, it crashes because
dart:ioFileobjects do not exist in the browser. - Security Rule Rejections: Firebase throws an unauthorized error because your storage rules default to denying all reads and writes.

Why This Happens (Real Explanation)
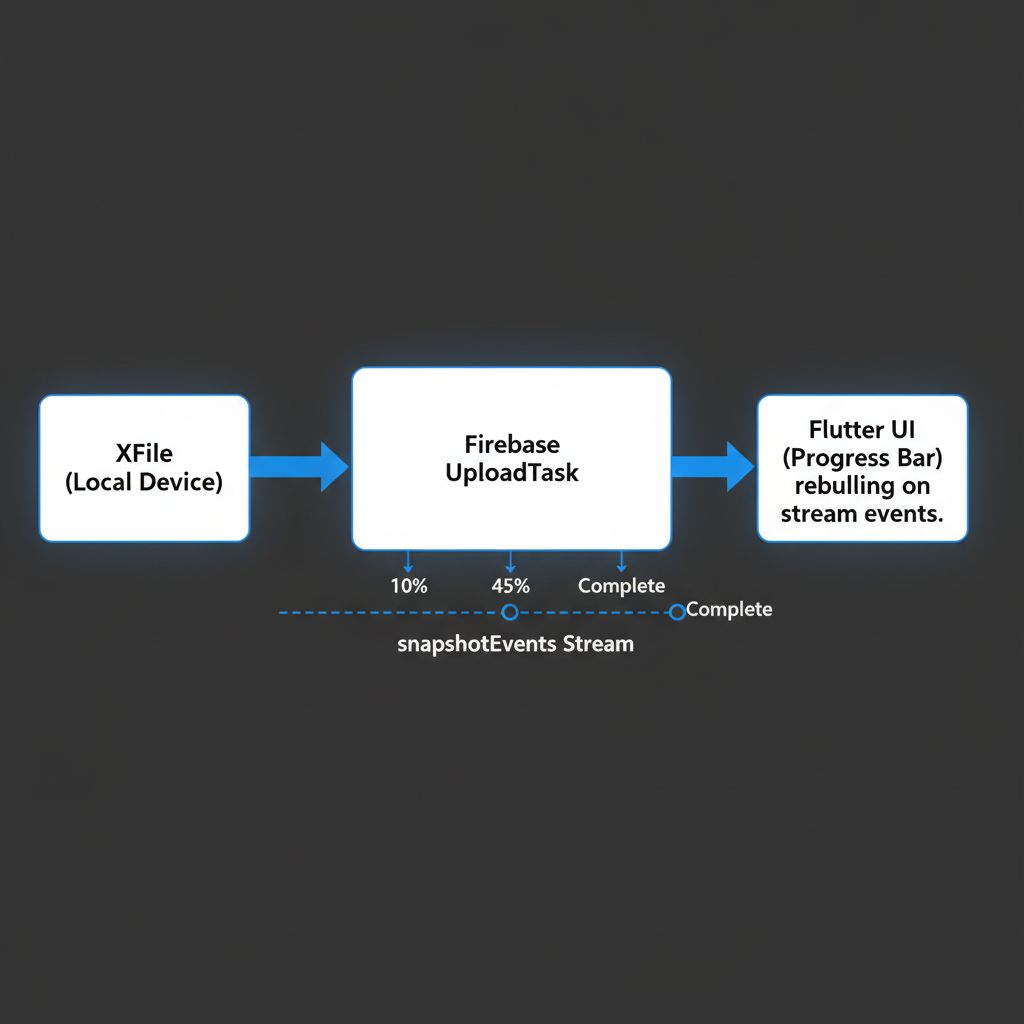
To fix this permanently, we need to understand how Flutter and Firebase Storage actually interact. When you initiate an upload, Firebase doesn’t just take the file and instantly return a success boolean. It creates an UploadTask.
An UploadTask is not a simple Future; it is a long-running process that emits a stream of state changes. Every few milliseconds, Firebase chunks the file, sends it over the network, and reports back on how many bytes were transferred. If you just await the task, you are ignoring this entire stream of valuable data. You are waiting blindly for the final completion event.
Furthermore, UI freezing happens because state management is often coupled too tightly to the UI layer. When you trigger a heavy network request without emitting intermediate states (like UploadState.loading(progress: 45)), the Flutter framework has no reason to rebuild the widget tree. The UI remains exactly as it was when the button was pressed.
When You Usually See This Issue
You will typically run into these upload nightmares in specific production scenarios:
- User Onboarding: When users are setting up their profile and need to upload an avatar. This is critical; if it fails, they abandon the app.
- Chat Applications: Sending photo attachments where immediate visual feedback (like a progress circle over the blurred image) is standard UX.
- E-commerce Apps: Sellers uploading multiple high-resolution product photos simultaneously.
- Cross-Platform Deployments: Moving a mobile app to Flutter Web and realizing your entire file-handling logic needs to be rewritten.
Quick Fix Summary (Decision Shortcut)
If you are in a rush and just need to know the core steps to fix your flutter upload image firebase storage implementation, here is the checklist:
- Use
image_pickerto get anXFile. - Convert properly: Use
File(xfile.path)for mobile, but usexfile.readAsBytes()withputData()for Flutter Web. - Don’t just await: Capture the
UploadTaskand listen to itssnapshotEventsstream. - Calculate progress: Divide
event.bytesTransferredbyevent.totalBytesto drive aLinearProgressIndicator. - Check Rules: Ensure your Firebase Storage Rules allow writes (e.g.,
allow write: if request.auth != null;).
Step-by-Step Solution (Core Section)
Let’s build a complete, production-grade image upload feature. We will focus heavily on showing a progress bar, handling errors, and ensuring the code is clean and scalable.
Step 1: Install the Correct Dependencies
First, ensure your pubspec.yaml has the necessary packages. You need the core Firebase packages and the image picker. Always use the latest stable versions from the official Dart package repository.
dependencies:
  flutter:
    sdk: flutter
  firebase_core: ^3.0.0
  firebase_storage: ^12.0.0
  image_picker: ^1.1.0
Note: Ensure you have already initialized Firebase in your main.dart using Firebase.initializeApp(). If you are also dealing with authentication issues during initialization, you might want to review how to fix Flutter Firebase Google Sign-In exceptions to ensure your user session is valid before uploading.
Step 2: Configure Firebase Storage Rules
Before writing a single line of Flutter code, go to your Firebase Console -> Storage -> Rules. The default rules block everything. For a production app, you usually want only authenticated users to upload files.
rules_version = '2';
service firebase.storage {
  match /b/{bucket}/o {
    match /user_images/{userId}/{allPaths=**} {
      // Only allow the user to read/write their own images
      allow read, write: if request.auth != null && request.auth.uid == userId;
    }
  }
}
Step 3: The Upload Logic with Progress Tracking
We are going to create a dedicated widget that handles picking the image, uploading it, and displaying the progress. In a larger app, you would likely extract the upload logic into a repository. If you are interested in scaling this, I highly recommend reading about mastering the Flutter Repository Pattern to keep your UI and network logic separated.
For this tutorial, we will keep it in a StatefulWidget so you can clearly see how the stream connects to the UI.
import 'dart:io';
import 'package:flutter/material.dart';
import 'package:image_picker/image_picker.dart';
import 'package:firebase_storage/firebase_storage.dart';
import 'package:flutter/foundation.dart' show kIsWeb;

class ImageUploadScreen extends StatefulWidget {
  const ImageUploadScreen({Key? key}) : super(key: key);

  @override
  State<ImageUploadScreen> createState() => _ImageUploadScreenState();
}

class _ImageUploadScreenState extends State<ImageUploadScreen> {
  final ImagePicker _picker = ImagePicker();
  XFile? _selectedImage;
  double _uploadProgress = 0.0;
  bool _isUploading = false;
  String? _downloadUrl;

  Future<void> _pickImage() async {
    try {
      final XFile? image = await _picker.pickImage(
        source: ImageSource.gallery,
        imageQuality: 80, // 💡 Tip: Always compress slightly
      );

      if (image != null) {
        setState(() {
          _selectedImage = image;
          _downloadUrl = null; // Reset previous state
          _uploadProgress = 0.0;
        });
      }
    } catch (e) {
      _showErrorSnackBar('Failed to pick image: $e');
    }
  }

  Future<void> _uploadImageToFirebase() async {
    if (_selectedImage == null) return;

    setState(() {
      _isUploading = true;
    });

    try {
      // 1. Create a unique file name
      final String fileName = '${DateTime.now().millisecondsSinceEpoch}_${_selectedImage!.name}';

      // 2. Create a reference to Firebase Storage
      final Reference storageRef = FirebaseStorage.instance
          .ref()
          .child('user_images')
          .child('user_123') // In a real app, use the actual user ID
          .child(fileName);

      UploadTask uploadTask;

      // 3. Handle Web vs Mobile differences correctly
      if (kIsWeb) {
        // Web requires bytes
        final bytes = await _selectedImage!.readAsBytes();
        uploadTask = storageRef.putData(bytes, SettableMetadata(contentType: 'image/jpeg'));
      } else {
        // Mobile uses File
        final file = File(_selectedImage!.path);
        uploadTask = storageRef.putFile(file, SettableMetadata(contentType: 'image/jpeg'));
      }

      // 4. Listen to the upload stream for progress
      uploadTask.snapshotEvents.listen((TaskSnapshot snapshot) {
        setState(() {
          _uploadProgress = snapshot.bytesTransferred / snapshot.totalBytes;
        });
      });

      // 5. Wait for the upload to complete
      final TaskSnapshot completedSnapshot = await uploadTask;

      // 6. Get the download URL
      final String downloadUrl = await completedSnapshot.ref.getDownloadURL();

      setState(() {
        _downloadUrl = downloadUrl;
        _isUploading = false;
      });

      _showSuccessSnackBar('Upload Complete!');

    } on FirebaseException catch (e) {
      setState(() {
        _isUploading = false;
      });
      _showErrorSnackBar('Firebase Error: ${e.message}');
    } catch (e) {
      setState(() {
        _isUploading = false;
      });
      _showErrorSnackBar('An unexpected error occurred: $e');
    }
  }

  void _showErrorSnackBar(String message) {
    ScaffoldMessenger.of(context).showSnackBar(SnackBar(content: Text(message, style: const TextStyle(color: Colors.white)), backgroundColor: Colors.red));
  }

  void _showSuccessSnackBar(String message) {
    ScaffoldMessenger.of(context).showSnackBar(SnackBar(content: Text(message, style: const TextStyle(color: Colors.white)), backgroundColor: Colors.green));
  }

  @override
  Widget build(BuildContext context) {
    return Scaffold(
      appBar: AppBar(title: const Text('Upload Profile Picture')),
      body: Padding(
        padding: const EdgeInsets.all(24.0),
        child: Column(
          crossAxisAlignment: CrossAxisAlignment.stretch,
          mainAxisAlignment: MainAxisAlignment.center,
          children: [
            // Image Preview Container
            Container(
              height: 250,
              decoration: BoxDecoration(
                color: Colors.grey[200],
                borderRadius: BorderRadius.circular(16),
                border: Border.all(color: Colors.grey[400]!),
              ),
              child: _selectedImage == null
                  ? const Center(child: Text('No image selected', style: TextStyle(color: Colors.grey)))
                  : kIsWeb
                      ? Image.network(_selectedImage!.path, fit: BoxFit.cover)
                      : Image.file(File(_selectedImage!.path), fit: BoxFit.cover),
            ),
            const SizedBox(height: 24),

            // Progress Bar Section
            if (_isUploading) ...[
              Text('Uploading: ${(_uploadProgress * 100).toStringAsFixed(1)}%', textAlign: TextAlign.center),
              const SizedBox(height: 8),
              LinearProgressIndicator(
                value: _uploadProgress,
                minHeight: 10,
                backgroundColor: Colors.grey[300],
                color: Colors.blueAccent,
                borderRadius: BorderRadius.circular(10),
              ),
              const SizedBox(height: 24),
            ],

            // Action Buttons
            ElevatedButton.icon(
              onPressed: _isUploading ? null : _pickImage,
              icon: const Icon(Icons.photo_library),
              label: const Text('Select Image'),
            ),
            const SizedBox(height: 12),
            ElevatedButton.icon(
              onPressed: (_selectedImage == null || _isUploading) ? null : _uploadImageToFirebase,
              icon: const Icon(Icons.cloud_upload),
              label: const Text('Upload to Firebase'),
              style: ElevatedButton.styleFrom(backgroundColor: Colors.blueAccent, foregroundColor: Colors.white),
            ),

            // Result Display
            if (_downloadUrl != null) ...[
              const SizedBox(height: 24),
              const Text('Download URL:', style: TextStyle(fontWeight: FontWeight.bold)),
              SelectableText(_downloadUrl!, style: const TextStyle(color: Colors.blue, fontSize: 12)),
            ]
          ],
        ),
      ),
    );
  }
}
Why This Code Works So Well
This implementation solves several major pain points simultaneously:
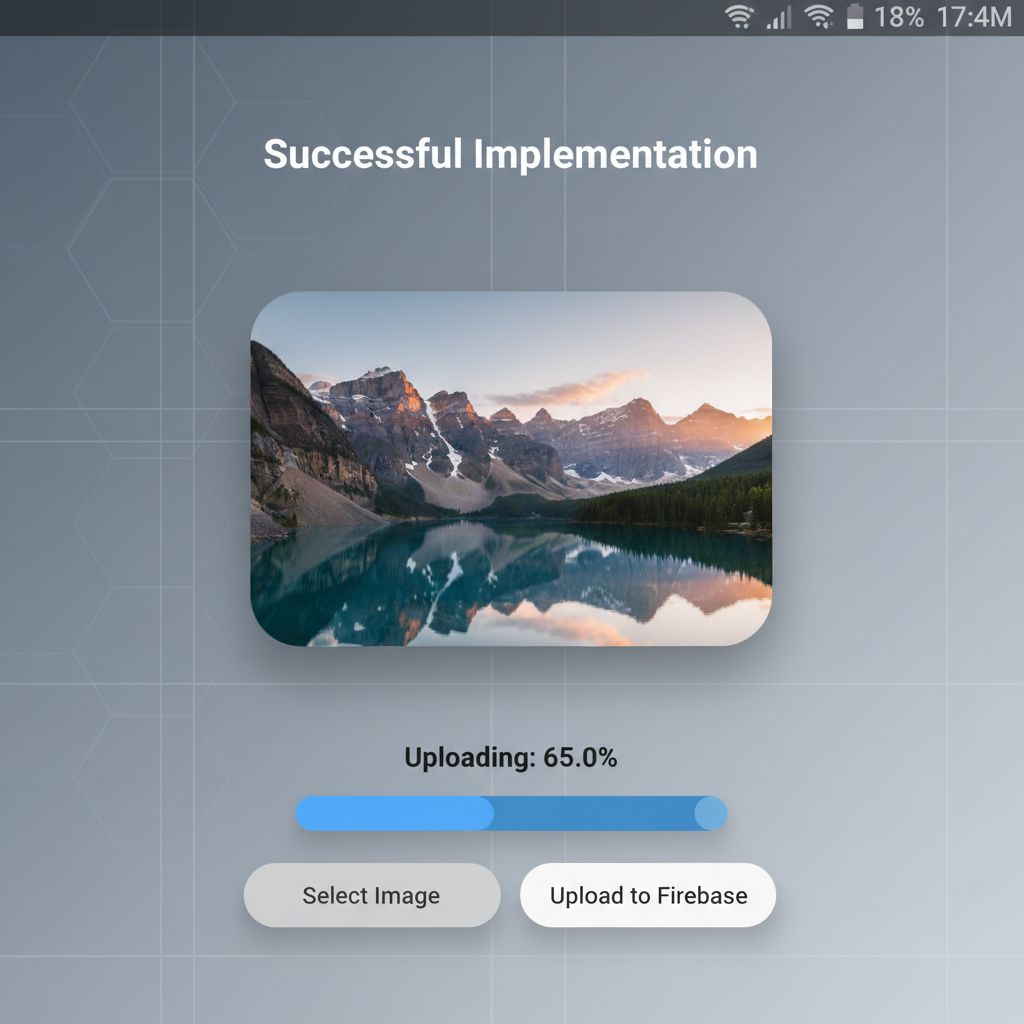
- The Progress Bar: By listening to
uploadTask.snapshotEvents, we get real-time callbacks. We calculate the percentage by dividingbytesTransferredbytotalBytesand pass that to aLinearProgressIndicator. This is the exact UX real users expect. - Cross-Platform Safety: The
kIsWebcheck is crucial. If you try to pass aFileobject to Firebase Storage on the web, your app will crash. By usingputData()with bytes for the web, andputFile()for mobile, this code is universally compatible. - Metadata: We explicitly set
SettableMetadata(contentType: 'image/jpeg'). If you omit this, Firebase might store the file as anapplication/octet-stream, which means browsers will try to download the image instead of displaying it when you use the URL later.
Common Mistakes Developers Make
Even with the right code, there are architectural and logic mistakes that can ruin your app’s performance.
- Uploading Raw Camera Images: Modern smartphone cameras take 10MB to 15MB photos. If you upload these directly, you will burn through your Firebase Storage free tier in days, and users on 3G networks will experience failed uploads. Always compress images before uploading.
- Ignoring State Management: In our example, we used
setStatefor simplicity. However, in a massive app, managing upload streams in the UI layer leads to spaghetti code. If you are building a scalable app, consider moving this logic into a state management solution. You can learn more about choosing the right tool in my guide on Riverpod vs Provider or exploring Cubit vs BLoC for scalable apps. - Not Handling App Lifecycles: If the user minimizes the app while a large video or image is uploading, the OS might suspend your app’s network operations. Standard
UploadTaskstreams do not survive app terminations.
Warnings and Practical Tips
⚠️ Warning on Memory Leaks: If you navigate away from the upload screen while the uploadTask.snapshotEvents stream is still active, you might cause a memory leak or a “setState() called after dispose()” error. Always ensure your stream subscriptions are managed, or use a state manager that handles disposal (like Riverpod or BLoC).
💡 Tip for Better Folder Structure: Don’t dump all your images in the root of your Firebase Storage bucket. Organize them by user ID and feature. For example: /users/{userId}/avatars/{fileName}. This makes it infinitely easier to write secure Firebase Rules and manage user data deletion requests later. If you struggle with organizing your Flutter code to match this logic, check out this scalable folder structure guide.
💡 Tip for Image Compression: Use a package like flutter_image_compress before passing the file to Firebase. You can easily reduce a 5MB image to 300KB with almost no visible loss in quality on a mobile screen.
Edge Cases and Limitations
While the solution above covers 95% of use cases, you must be aware of its limitations.
Background Uploads
The standard Firebase Storage SDK requires your app to be active in the foreground (or briefly in the background) to complete the upload. If you are building an app that uploads massive files (like 4K videos) and you want the upload to continue even if the user swipes the app away, this standard SDK approach will fail. You would need to use native background upload managers (like workmanager combined with native platform channels), which adds significant complexity.
Handling Network Drops
Firebase Storage is actually quite smart. The UploadTask can automatically pause and resume if the network drops briefly. However, if the network drops for an extended period, the task will throw a FirebaseException with the code storage/retry-limit-exceeded. Your code must catch this specific error and offer the user a “Retry Upload” button.
What Happens If You Ignore This Problem
If you choose to stick with a basic await putFile() without a progress indicator or error handling, the consequences are immediate in production:
- High User Churn: Users are impatient. If an upload takes 5 seconds and there is no visual feedback, they will assume the app is frozen and force-quit it.
- Data Inconsistency: If the UI doesn’t block the user during an upload, they might submit a form before the image upload finishes. You will end up with database records that have null or broken image URLs.
- Unnecessary Costs: Without proper error handling, users might repeatedly tap the upload button, initiating multiple simultaneous upload streams of the same large file, draining your Firebase bandwidth quota.
FAQ Section
How do I get the download URL after uploading?
You must wait for the UploadTask to complete, then call getDownloadURL() on the resulting snapshot’s reference. Example: await snapshot.ref.getDownloadURL(). Do not try to guess the URL structure, as Firebase appends unique access tokens to the end of the URL.
Why is my upload stuck at 0% and then fails?
This is almost always a Firebase Security Rules issue. If your rules are set to allow read, write: if false;, the upload will initiate, hang briefly, and then throw an unauthorized exception. Check your rules in the Firebase Console.
Can I upload multiple images at once?
Yes, but Firebase Storage does not have a single putFiles() method. You must loop through your list of files and create an UploadTask for each one. You can use Future.wait() to wait for all of them to complete, but tracking combined progress requires custom math (summing the transferred bytes of all active tasks).
Final Takeaway & Conclusion
Implementing a flutter upload image firebase storage feature that feels premium and reliable comes down to respecting the asynchronous nature of file transfers. By moving away from simple futures and embracing the UploadTask stream, you empower your users with real-time visual feedback.
Here is your final actionable checklist before you deploy:
- Ensure your Firebase Security Rules are correctly configured for authenticated users.
- Implement a progress bar using the
snapshotEventsstream. - Handle Web vs Mobile file types (
FilevsUint8List) to prevent platform crashes. - Wrap your upload logic in robust
try-catchblocks to handleFirebaseExceptionnetwork drops. - Compress your images before uploading to save bandwidth and storage costs.
File uploads don’t have to be a source of frustration. By structuring your code carefully and prioritizing the user experience with a smooth progress indicator, you elevate your app from a basic prototype to a professional, production-ready product. Apply this code, test it on a real device with a throttled network, and watch your UI respond perfectly.