Introduction
If you are reading this, you have probably hit a wall. You started building a Flutter app, everything was going great with setState, and suddenly, your code turned into a tangled mess. Your UI is freezing during API calls, passing data between screens feels like a nightmare, and you are staring at a massive, 1000-line StatefulWidget wondering where it all went wrong.
Then, someone told you to use BLoC. You looked at the documentation, saw words like “Streams,” “Sinks,” “Yield,” and “Emit,” and felt a massive wave of frustration. You are not alone. I have been building production Flutter apps for over five years, and let me tell you a secret: nobody understands the Flutter BLoC pattern on their first day. It feels over-engineered until the exact moment it saves your project.
This flutter bloc tutorial for beginners is designed specifically for you. We are not going to look at textbook definitions or robotic documentation. We are going to solve the problem you are facing right now: how to cleanly separate your messy business logic from your UI so your app becomes scalable, testable, and easy to maintain in modern Flutter (using the latest Dart 3 and Flutter 3.x standards in 2026).
Take a deep breath. By the end of this guide, you will understand exactly how BLoC works, and you will never want to go back to spaghetti code again.
What the Problem Is
Before we can understand the solution, we need to understand the pain you are currently experiencing. In Flutter, the UI is declarative. This means your screen is a reflection of your state. When you are a beginner, you usually manage this state directly inside your widgets.
The problem arises when your app grows. You need to fetch data from an API, show a loading spinner, handle error messages, and update the UI. If you do all of this inside a StatefulWidget, your UI code and your business logic (the “brains” of your app) become tightly coupled. When a bug happens—like the UI not updating when data arrives—you have to hunt through hundreds of lines of UI layout code just to find the broken logic.
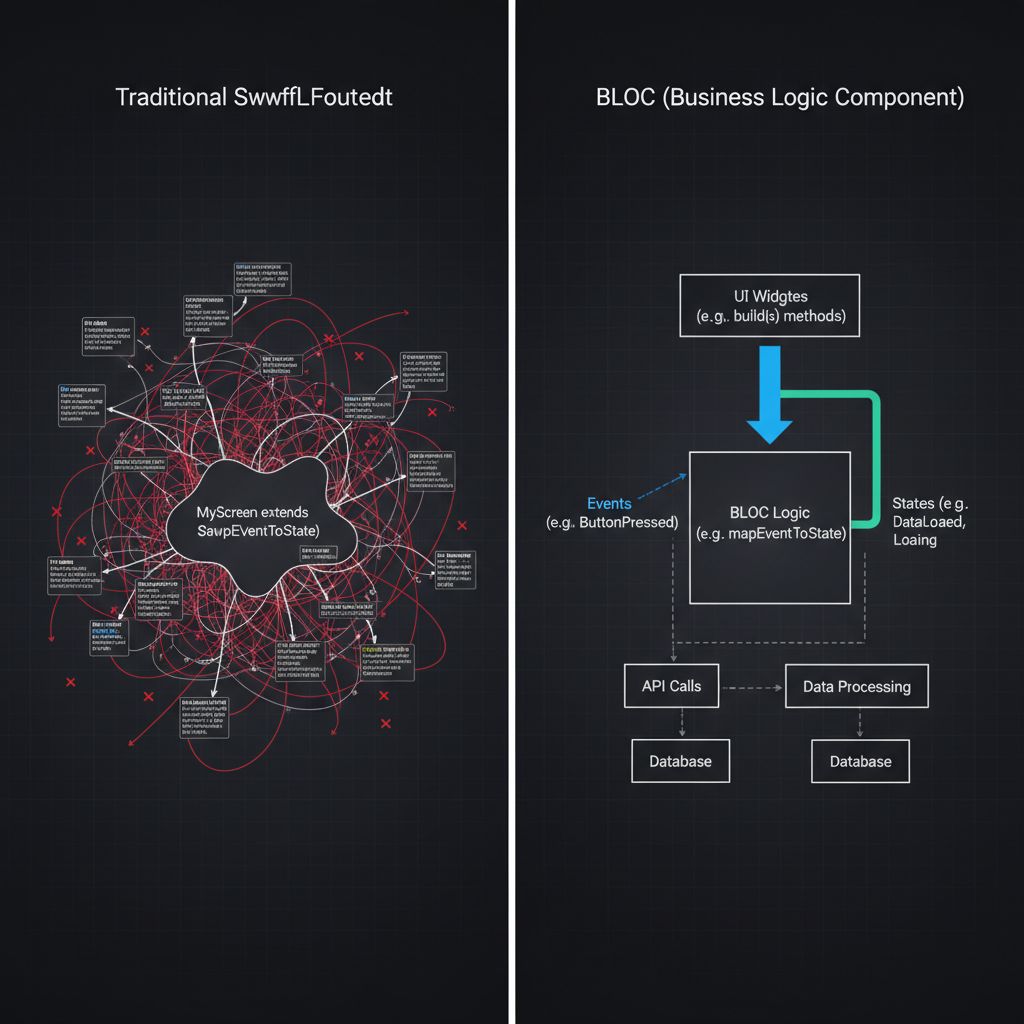
You experience this problem as:
- Unexplained UI bugs where the screen doesn’t match the actual data.
- “SetState() called after dispose()” red screen errors.
- Extreme difficulty adding new features without breaking existing ones.
- An inability to write unit tests for your API logic because it is trapped inside a Widget.
Why This Happens (Real Explanation)
This happens because Flutter widgets are designed to do one thing: paint pixels on a screen based on the data they are given. They are not designed to handle complex HTTP requests, database queries, or heavy computations.
When you mix logic and UI, you break the fundamental rule of separation of concerns.
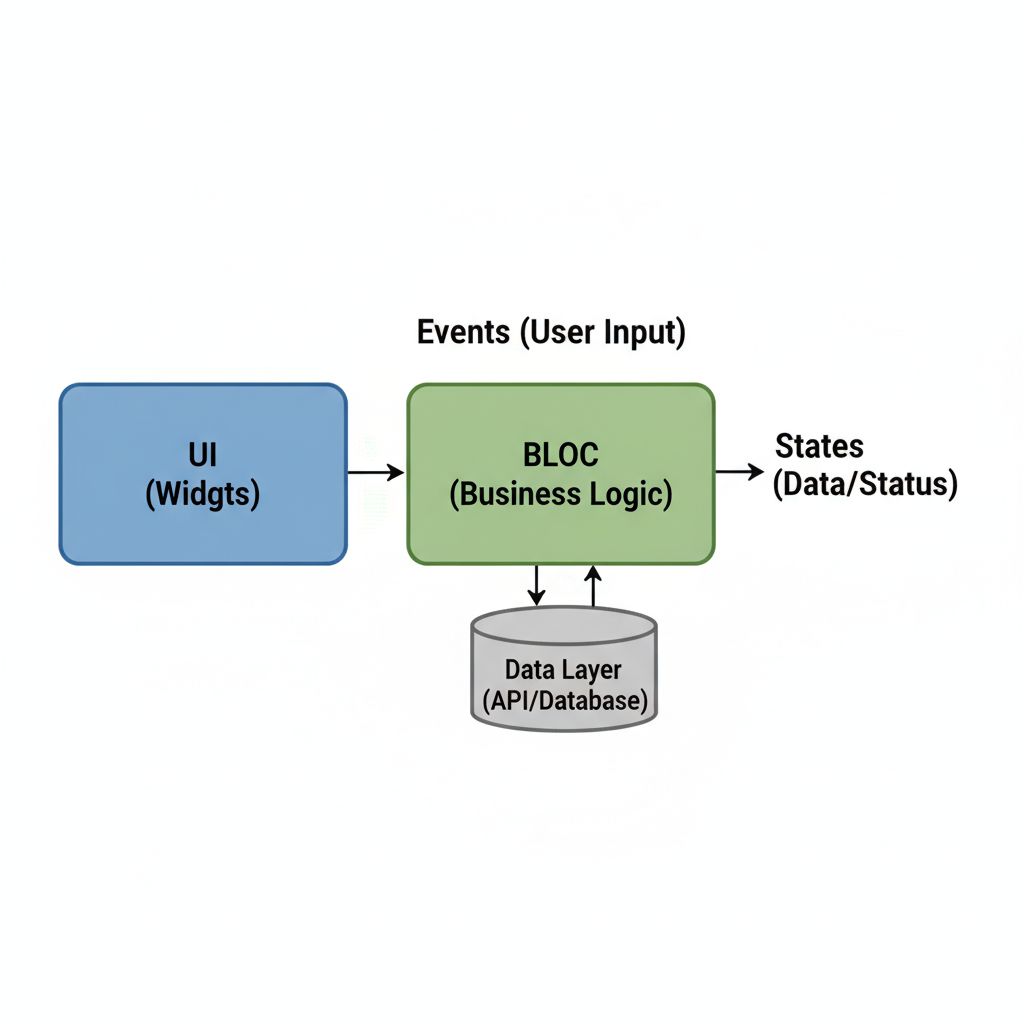
This is where the flutter bloc pattern explained simply comes in. BLoC stands for Business Logic Component. Think of BLoC as a middleman between your UI and your data.
Here is the absolute core of how it works:
- Events go IN: The user taps a button (e.g., “Fetch Profile”). The UI sends an Event to the BLoC.
- Logic happens: The BLoC receives the event, talks to your API or database, and figures out what to do.
- States come OUT: The BLoC spits out a new State (e.g., “LoadingState”, then “SuccessState”). The UI listens to these states and redraws itself.
The UI never touches the API. The API never touches the UI. They only communicate through Events and States.
When You Usually See This Issue
You will usually hit the “I need BLoC” wall in these scenarios:
- Moving from prototype to production: Your simple app now needs real user authentication, token management, and error handling.
- Team environments: You are working with other developers. If everyone writes logic inside the UI, merge conflicts will destroy your productivity.
- Client projects: The client asks for a seemingly simple change, but because your logic is tangled in the UI, it takes you three days to safely implement it.
It is worth noting that while BLoC is an industry standard for complex apps, the Flutter ecosystem offers multiple great solutions. If you are evaluating your options, you might also want to read our deep dive on Riverpod vs Provider Flutter: Why It’s Time to Switch in 2026 to see how other modern state management tools compare.
Quick Fix Summary (Decision Shortcut)
If you are frustrated and just want the core rules to fix your architecture right now, here is the quick summary:
- Stop using
setStatefor business logic. Only use it for local UI animations or toggles. - Install the packages: Add
flutter_blocandequatableto yourpubspec.yaml. - Define 3 files per feature:
feature_event.dart,feature_state.dart, andfeature_bloc.dart. - Use
BlocProviderto give your UI access to the logic, andBlocBuilderto rebuild the screen when the state changes.
Step-by-Step Solution (Core Section)
Let’s build a real-world scenario. Not a simple counter app, because that doesn’t help you with real problems. We are going to implement flutter bloc api integration by building a User Profile screen that fetches data from the internet.
Step 1: Add the Dependencies
Open your pubspec.yaml and add the necessary packages. We use the official flutter_bloc library, which handles all the heavy lifting of streams for us.
dependencies:
  flutter:
    sdk: flutter
  flutter_bloc: ^8.1.5
  equatable: ^2.0.5
Note: equatable is crucial. It helps Dart compare objects so the UI only rebuilds when the state actually changes.
Step 2: Define the Events (What happens?)
Events are the inputs. What can the user do on this screen? They can request to load the profile.
import 'package:equatable/equatable.dart';

// profile_event.dart
sealed class ProfileEvent extends Equatable {
  const ProfileEvent();

  @override
  List<Object> get props =>[];
}

class FetchProfile extends ProfileEvent {}
Why this works: We use Dart 3’s sealed class. This is a modern standard that ensures we handle every possible event later in our code. FetchProfile is the trigger we will fire when the screen opens.
Step 3: Define the States (What does the screen look like?)
States are the outputs. What are the different phases of our UI?
import 'package:equatable/equatable.dart';

// profile_state.dart
sealed class ProfileState extends Equatable {
  const ProfileState();

  @override
  List<Object> get props =>[];
}

class ProfileInitial extends ProfileState {}

class ProfileLoading extends ProfileState {}

class ProfileLoaded extends ProfileState {
  final String username;
  final String bio;

  const ProfileLoaded({required this.username, required this.bio});

  @override
  List<Object> get props =>[username, bio];
}

class ProfileError extends ProfileState {
  final String message;

  const ProfileError(this.message);

  @override
  List<Object> get props => [message];
}
Why this works: We have explicitly defined every possible state our UI can be in. Initial, Loading, Loaded (with data), and Error (with a message). The UI will simply look at this state and draw the correct widget. No guessing.
Step 4: Create the BLoC (The Brains)
Now we connect the Events to the States.
import 'package:flutter_bloc/flutter_bloc.dart';
import 'profile_event.dart';
import 'profile_state.dart';

// profile_bloc.dart
class ProfileBloc extends Bloc<ProfileEvent, ProfileState> {
  ProfileBloc() : super(ProfileInitial()) {
    // When a FetchProfile event comes in, run the _onFetchProfile function
    on<FetchProfile>(_onFetchProfile);
  }

  Future<void> _onFetchProfile(
    FetchProfile event,
    Emitter<ProfileState> emit,
  ) async {
    // 1. Tell the UI to show a loading spinner
    emit(ProfileLoading());

    try {
      // 2. Simulate an API call (Replace with your real API repository)
      await Future.delayed(const Duration(seconds: 2));

      // 3. Tell the UI we got the data
      emit(const ProfileLoaded(
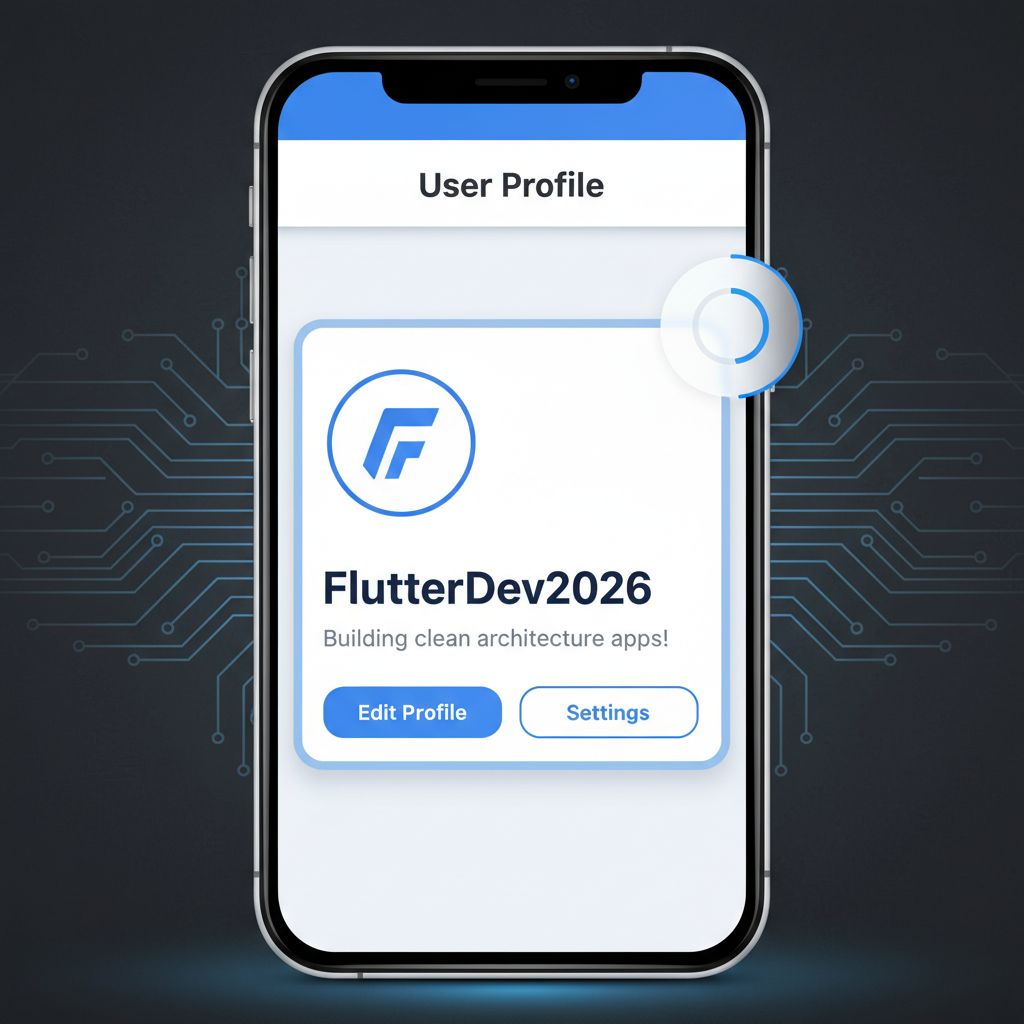
        username: "FlutterDev2026",
        bio: "Building clean architecture apps!"
      ));
    } catch (e) {
      // 4. Tell the UI an error occurred
      emit(ProfileError("Failed to fetch profile: ${e.toString()}"));
    }
  }
}
Why this works: The emit() function is the magic word. It pushes a new state out to the UI. Notice how clean this is? There is no UI code here. You can easily test this logic in isolation.
Step 5: Connect it to the UI
Finally, we need to provide the BLoC to our widget tree and build the UI based on the state.
import 'package:flutter/material.dart';
import 'package:flutter_bloc/flutter_bloc.dart';
import 'profile_bloc.dart';
import 'profile_event.dart';
import 'profile_state.dart';

// profile_screen.dart
class ProfileScreen extends StatelessWidget {
  const ProfileScreen({super.key});

  @override
  Widget build(BuildContext context) {
    // BlocProvider creates the Bloc and makes it available to children
    return BlocProvider(
      create: (context) => ProfileBloc()..add(FetchProfile()),
      child: Scaffold(
        appBar: AppBar(title: const Text('User Profile')),
        body: Center(
          // BlocBuilder listens to state changes and rebuilds ONLY this part
          child: BlocBuilder<ProfileBloc, ProfileState>(
            builder: (context, state) {
              if (state is ProfileInitial || state is ProfileLoading) {
                return const CircularProgressIndicator();
              }
              else if (state is ProfileLoaded) {
                return Column(
                  mainAxisAlignment: MainAxisAlignment.center,
                  children:[
                    Text(state.username, style: const TextStyle(fontSize: 24, fontWeight: FontWeight.bold)),
                    const SizedBox(height: 10),
                    Text(state.bio),
                  ],
                );
              }
              else if (state is ProfileError) {
                return Text(state.message, style: const TextStyle(color: Colors.red));
              }

              return const SizedBox.shrink();
            },
          ),
        ),
      ),
    );
  }
}
When to use this solution: Use this pattern whenever you are fetching data, submitting forms, or handling complex state that spans multiple screens.
When NOT to use this solution: If you are just toggling a checkbox, animating a button, or managing the local open/close state of a Flutter Floating Action Button Menu, do not use BLoC. A simple setState is perfectly fine for transient, local UI state.
Common Mistakes Developers Make
As a beginner, you will likely fall into a few traps. Here are the most common mistakes I see in code reviews:
- Mutating state instead of emitting new state: BLoC relies on identifying changes. If you modify an existing list inside a state and emit the same state object,
BlocBuilderwill not rebuild because it thinks nothing changed. Always emit a new instance of the state. - Putting UI logic in the BLoC: Your BLoC should never know about
BuildContext,TextEditingController, or navigation routes. If you pass aBuildContextinto a BLoC event, you are breaking the architecture. - Forgetting
Equatable: If you don’t use the equatable package (or manually override==andhashCode), your UI might rebuild unnecessarily, causing severe performance drops in complex lists.
Warnings and Practical Tips
⚠️ Warning: Don’t over-engineer simple screens. BLoC is a powerful tool, but it requires boilerplate. If a screen has absolutely no business logic and just displays static text, you don’t need a BLoC for it.
💡 Tip: Use BlocListener for Navigation and Snackbars. BlocBuilder is only for drawing widgets. If you want to show a Snackbar when an error occurs, or navigate to a new screen when login is successful, use a BlocListener. It listens to state changes and runs code exactly once per change.
💡 Tip: Keep UI concerns in the UI. For example, if you are building a complex scrolling header like a Mastering Flutter SliverAppBar, the scroll offset tracking should remain in the UI layer. Do not send scroll coordinates to your BLoC on every pixel movement; it will destroy your app’s performance.
Edge Cases and Limitations
While BLoC is incredibly robust, there are edge cases where it can feel clunky:
- Rapid Continuous Streams: If you are dealing with high-frequency data, like real-time GPS tracking or a 60fps game loop, emitting a new BLoC state for every coordinate change might cause memory overhead. In these strict edge cases, using raw
StreamBuilderor specialized game engines is better. - Massive Forms: Handling a form with 20 input fields using BLoC can result in a massive amount of boilerplate if you create an event for every keystroke. Consider using
Cubit(a simpler version of BLoC) or specialized form packages alongside BLoC to handle local validation.
What Happens If You Ignore This Problem
If you decide that learning clean architecture flutter bloc is too hard and continue stuffing API calls into your UI, your app will eventually hit a dead end.
As your app grows, you will experience “prop drilling”—passing data through ten layers of constructors just to reach a child widget. Your app will become prone to memory leaks because active API calls won’t be properly disposed of when a user navigates away from a screen. Eventually, adding a single new feature will break three unrelated features, and your development speed will grind to a halt.
FAQ Section
What is the difference between flutter cubit vs bloc?
Cubit is a simplified version of BLoC. While BLoC uses Events to trigger state changes, Cubit uses direct functions. If your logic is simple, use a Cubit. If you need advanced features like debouncing search inputs or tracking exactly what triggered a state change, use a full BLoC. Both are included in the flutter_bloc package.
Is flutter bloc vs provider a valid comparison?
Not exactly. Provider is a dependency injection tool (it provides objects to the widget tree). BLoC is a state management pattern. In fact, the flutter_bloc package uses Provider under the hood (via BlocProvider) to pass the BLoC down the tree. They work together, not against each other.
How do I handle multiple BLoCs on one screen?
You can use MultiBlocProvider to provide multiple BLoCs at the top of your screen, and then use separate BlocBuilder widgets for different parts of your UI. Keep your BLoCs focused on single features (e.g., one BLoC for Authentication, one for Profile Data).
Final Takeaway & Conclusion
Learning the flutter bloc state management pattern is a rite of passage for every serious Flutter developer. It takes you from writing messy, unpredictable scripts to building professional, enterprise-grade applications.
Your Actionable Checklist:
- Separate your thinking: What are the Events (inputs)? What are the States (outputs)?
- Write your logic in the BLoC, completely isolated from Flutter UI code.
- Use
BlocProviderto inject the BLoC into the tree. - Use
BlocBuilderto reactively draw your UI based on the current state.
Don’t be discouraged if you have to read your code a few times to understand the flow. The “aha!” moment will come. Once you wire up your first successful API call using BLoC and watch your UI gracefully transition from a loading spinner to beautifully rendered data without a single setState, you will realize the power of clean architecture. Keep building, trust the pattern, and you’ve got this.